Sunday, January 29, 2012

Oxtail Soup

Oxtail is so amazing in stews and soups.  When patiently simmered for hours and hours this luscious protein adds a depth to your dish that plain beef can't match.  Maybe it's the marrow or the bones themselves that imparts such flavor.  Whatever it is, it is certainly worth the effort.
Tonight's dinner is from the cookbook "Falling off the bone" (Jean Anderson, Publisher: John Wiley and Sons)
http://www.amazon.com/Falling-Off-Bone-Jean-Anderson/dp/0470467134/ref=sr_1_1?ie=UTF8&qid=1327819272&sr=8-1

I bought this cookbook simply for the title and I'm so glad I did.  Every recipe has been a winner so far.

For this recipe start with about 3 pounds oxtails.


I had a hard time finding oxtail here in Marysville.  I first tried at Silvana Meats (my favorite organic butcher shop)
http://www.silvanameats.com/
with no luck.  I finally found them at Fred Meyer.  I really hope more of the local grocery stores start to carry this fantastic soup ingredient.

Put this in a heavy dutch oven (this piece of equipment is a must for any serious home cook) with about 8 cups of water, 2 bay leaves about 2 tsp. salt and about 1/2 tsp. black pepper.  Bring to a boil, cover and adjust heat so it is just simmering lazily for about 4 1/2 to 5 hours (I let mine bubble away for the full 5 hours).

Take the simmered meat (should be falling off the bone at this point) out with a slotted spoon and place onto a cutting board.


Pull the meat from the bone and discard the bone and any extra fat.  This rendered about 1 lb. of yummy melt-in-your-mouth beef.  Separate the fat from the broth.  I used a fat-separator but you can just put the broth into a large bowl, and using a large spoon, skim the fat off the top of the broth.


Rinse and dry the dutch oven.  To it add 2 Tbs. bacon grease over medium/high heat until it starts to shimmer.  Add 4 bunches of green onions (also called scallions) chopped, and garlic.  The recipe called for 3 cloves garlic minced but I think I added about 6 or 7 cloves worth.

COOKING LESSON:  How to prepare and chop green onion in no time:

Working with one bunch at a time


Thoroughly clean and line up the green onions with their little tops all matched up.  Now slice off all the tops at once.


Hold onto the bunch and slicing on the bias (a slanted cut) cut the onions in about 1/2 inch chunks


Saute the onion and garlic for about 3-5 minutes stirring almost constantly so the garlic doesn't burn.

Now add 2 large potatoes, cut into 1/2 inch dice.  The recipe says to peel the potatoes, but I never peel my potatoes (even when making mashed potatoes).  The skin adds a great texture and fiber to the meal.  Just thoroughly scrub the potatoes and cut out any eyes that are growing anything (these can become poisonous with heat and cause tummy problems).

Also add about 2 carrots peeled and thickly sliced and about 2 ribs worth of celery.

COOKING LESSON:  Here is an easy way to cut up your celery:


Do not take off the ribs to be cut up.  Instead keep the thoroughly washed celery whole.  Hang on to the entire celery and slice off from the end what you need.


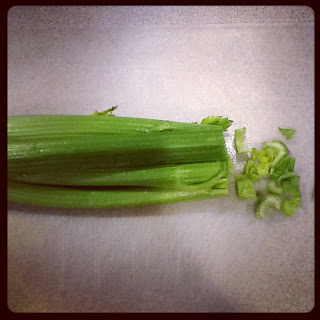
The rest just keep in the fridge wrapped in a paper towel and plastic bag.
Return the meat to the pot with the veggies and add the reserved cooking broth (with the 2 bay leaves).  If your liquid doesn't seem to be enough you can add a little water.  The broth shouldn't quite cover the meat and veggies.


Bring to a boil again and cover turning down the heat to just a simmer for about 45 minutes, just until the veggies are tender.

Mix in 1 can diced tomatoes and their juice (14.5 oz) and about 1/4 cup fresh parsley chopped.

The weirdest thing.  My Italian parsley plant on the back deck thinks it's July.  According to Ed Hume in his "Northwest Gardening Made Easy" These guys should peeter out by end of fall.  Only about a week ago this little guy had a foot of snow on top of him.  I don't have the heart to tell him it's January and that he really should be brown and dead.  Ha, instead I'll use him in my soup :)


Doesn't the soup look pretty?


Continue simmering the soup, lid off, for another 15 minutes or so just until all the ingredients are all kissy-cozy with each other.

Adjust salt and pepper to taste.


Sweet sweet Lord in Heaven.  The flavor is so rich and yummy.  This is one of those soups that will only continue to improve as it's reheated in the next couple of days (honestly with my family I don't think it will survive more than 48 hours in the fridge).

Here is the WW breakdown:

3 pounds oxtails that rendered about 1lb. of meat:  47 pts (the closest I could find on the Weight Watcher site to this luscious meat was "brisket")
2 Tbs. Bacon grease: 7 pts.
2 large potatoes: 9 pts.

63 pts/8.5 servings = 7.41 (7 pts) each

Saturday, January 28, 2012

Roasted Red Pepper Hummus

I can't wait to take this yummy hummus to church tomorrow and let everyone try it.  I got the recipe from Bon Appetite-Tastes of the World.  This was a little book that came free with my subscription.  I love Bon Appetit magazine.  Some of my favorite stuff comes from them.

For this recipe you want to start with your food processor.  While it is in the "on" position, with the blades shirring, drop 2 cloves of garlic, one at a time, allowing them to dance around in and become minced. 


This is one of the few times I will use the amount of garlic suggested in the recipe.  Usually I am very liberal with my garlic, often adding 3 times what the recipe calls for.  This hummus won't be cooked so the garlic will be raw and very present.  2 cloves should be more than plenty.

Scrape down the inside of the food pro and add 1 can (15 oz.) garbanzo beans (also called "chickpeas") that have been drained and rinsed, 1/3 cup tahini and 1/3 cup lemon juice (which was about 1 1/2 lemons worth).

Tahini is sesame seed paste that you can find at health food stores or a Middle Eastern store.


Blend this all together until smooth.


 Add about 1/2 cup drained jarred roasted red peppers that have been chopped.  blend again until smooth.  Taste and adjust with salt, pepper or lemon juice.

Serve with pita chips.


I will be sharing this at church tomorrow.

http://thehillsidechurch.com/#/about

I like this hummus.  It's bright and delicious and just a little garlic-y.  I like the roasted red pepper that comes through and stays on the palate.

Breakfast Mojito

I love a good Mojito so when I saw this was the next recipe in the Everyday Happy Herbivore (Lindsay S. Nixon-BenBella Books, Inc.) I was eager to try it.  During the Summer months I have plenty of mint in my garden, so anytime I can use the little herb I do.  A little gardening tip:  Never Never NeveRNEVERNEVERNEVER never plant mint in your precious little raised bed garden.  It is a bully and will quickly take over every inch.  and you can't kill it.  No matter how many times you pull it up.  Kinda like the cockroach of the garden you could say.  Anyway, safely planted in a large planter on my deck I can keep it contained.  Unfortunately, January in the Northwest is not the best time to harvest mint.  Mine is a little dormant currently.


That is why God made grocery stores.


For the smoothie you blend together 1/2 cup non-dairy milk (I used almond milk, cause that's what I had), 1 frozen banana (ripe), 1 cup baby spinach, 1 tsp. vanilla extract and the juice of 1/2 lime.  I recommend zapping your lime about 11 seconds in the microwave prior to cutting it.  It helps to release more juice when squeezed.  Works well for lemons, too.


Blend this until smooth.  Now add a handful of mint leaves and about 3 or 4 ice cubes.

Blend blend blend blend until smooth and creamy.

At this point taste your smoothie.  I found mine...um...healthy.  The recipe says you can at this point add more mint, lime or some agave nectar to taste.  I only added a few drops of the agave nectar and this helped the taste.


When cooking (especially when cooking for other people) it is IMPERATIVE that you do not double dip.  Not only is it disgusting for anyone else eating your meal, if you are a double-dipper, it can also ruin many recipes.  Our saliva contains enzymes that God put there to begin the process of breaking down carbs (essentially kick-starting the whole digestive process).  If you taste your dish and put your spoon back into your recipe, you have now added enzymes to your dish.  If there is enough heat then the enzymes are killed and no harm done (except it is disgusting).  If your dish is not hot enough the enzymes begin munching on the carbs in your dish and 30 minutes later you will wonder why your creation is separating and getting watery.  Don't be that cook.

This was my final product (notice the Oskar Blues glass I used.  I highly recommend this brewery the next time you are in the Denver area.  Their beer rocks.).


The best part about this smoothie is the nutrition that is packed into little or no points (my smoothie came out to 0 points because I used almond milk that only had about 17 calories per half cup).  Some may argue that with the agave drops I should count it 1 point.  Whatever.

It wasn't bad tasting with the agave.  I actually grew to like it by the time I took the last sip.  I will probably make this again when I want something cold and creamy and don't have points left.  Not a favorite, though.

Wednesday, January 25, 2012

Roasted love on the menu tonight

After a full day of work my intention was to cook a quick "30-minute meal", but that didn't quite happen.  My recipe choice for tonight is "Chicken with Bacon and Vinegar"(can't go wrong if there is bacon in the title.) from "America's Test Kitchen 30-Minute Suppers" (from the editors of Cook's Illustrated).
http://www.cooksillustrated.com/bookstore/detail.asp?PID=456
I love love love love love this cookbook.  I am learning so much while cooking my way through it.

The recipe suggests that you serve this with mashed or roasted potatoes.  I have these wonderful little fingerling potatoes from Costco.


Notice the different colors.  Eating a colorful meal is a good way to ensure that you get an array of vitamins and nutrients.  The little purple and red ones are rich in antioxidants.

I will be roasting these bad boys with sweet onion and garlic.  Yum.

After thoroughly washing the potatoes, cut each of the little cuties in half and add to a roasting dish that you have sprayed with Pam.  Add 1 chopped onion and 1 full head of garlic, each of the cloves peeled.  Season with sea salt and pepper to taste and drizzle with about 2 Tbs. of olive oil.  Stir together in the pan.  The garlic will practically melt as the potatoes roast and the onion will get soft and sweet as the sugars in the onion caramelize.  Bake at 350F, stirring every 10 minutes.  The process is best when not rushed, so you will want to get this into the oven at least 30 minutes before you start the chicken recipe.


For the chicken:

Cook the bacon over medium-high heat until crispy.  Using a heat-resistant slotted spoon transfer the crispy bacon to a plate topped with a paper towel.

The drippings can be saved in a glass jar for future cooking magic.  CAREFUL: When pouring very hot bacon grease into a glass jar you MUST do this very slowly (a few drops at a time, patient to let the glass warm up) so the glass does not break.  RESERVE 2 TBS. BACON GREASE IN THE PAN.


Pat dry with paper towels 4 boneless, skinless chicken breasts.  This should be about 1 1/2 lbs of chicken.


Salt and pepper the breast pieces well.  Don't be afraid to season!

Put about 1/3 cup flour into a shallow bowl and dredge each chicken breast in, shaking off extra flour.  Place each breast into the pan of hot bacon grease (still on med-high heat).  Brown each side about 5-6 minutes (the recipe says about 4 minutes but I found with my stove to get that nice brown goodness it needed 1-2 extra minutes).


Place browned chicken on a plate to rest for a bit.


Turn the heat down to medium and toss in 2 shallots that are minced.

COOKING LESSON:  HOW TO MINCE SHALLOTS

Slice the ends off and peel the tough outside skin of the shallots like you would an onion.


Now cut up the shallots into uniform pieces.


Using a kitchen chopper (mine is from Pampered Chef--and in my opinion they make the best choppers) chop several pieces at a time until your shallot is the consistency you want.

Saute the shallots about 1 minute until softened.  Add 1/2 cup sherry vinegar (I only had about half this much of sherry vinegar so I substituted half balsamic and half red wine vinegar for the rest) and stir and simmer until this is syrupy, about 1 minute.  Now stir in 1/3 cup chicken broth, and 2 tsp honey.  Nestle the chicken (and any juicies that accumulated) into the pan, cover and simmer until chicken is cooked through.  The recipe said this was about 5 minutes, but honestly my chicken took about 10 minutes (make sure it is not pink in the middle).


Transfer the chicken to a platter and tent with foil.

Continue to simmer and thicken the sauce for about 5 minutes.  It should be looking very dark and smelling fantastic.  Take the pan off the heat.

Stir in 2 Tbs. unsalted butter and 2 tsp. more vinegar.  Taste and adjust if it needs more salt or pepper.

Your potatoes should be about done.  The onion should be caramelized and the garlic should be almost melting.  Taste and adjust if it needs more salt or pepper.


Voila!

This was so rich and delicious!  The sauce had a you-must-have-cooked-all-day flavor and the chicken was very juicy.  My teenagers made noises eating with a thumbs up.

WW Stats:

The potatoes you will have to portion out (I served my husband 6 oz.) and I figured the points as:
4 for the potatoes themselves
1 more point for the olive oil it was roasted in.

The chicken broke down like this:
5 slices bacon (crisp cooked): 7pts
2 Tbs. bacon fat: 7 pts.
chicken breasts: 26 pts.
2 Tbs. honey: 4 pts
2 tsp. unsalted butter: 6 pts.

Divided into 4 portions (and these made large portions): 13.25 pts. each (round down to 13 points).

Monday, January 23, 2012

Want to save a couple hundred dollars a year?

Make your own laundry soap!!!

I was skeptical until I tried this myself.  I received the recipe from my sisters (Terri in Kentucky and Jennifer in Ohio) last year.  It is sooooooo easy and truly very frugal.  I actually prefer the smell of the fresh washed closthes with this soap than I did when we used commercial brands.

The ingredient list is:
1/3 bar Fels-Naptha soap
1/2 cup washing soda
1/2 cup Borax powder
Water

Start by using a large 2 gallon (or larger) bucket (you can see mine is dearly loved).


In a large sauce pan, heat water on a very low setting (you don't want the water to ever boil) and add Fels-Naptha soap.  My Mother tells me that her mother (Grandma Amy) used Fels-Naptha to clean EVERYTHING.  The floors, the dishes, the dogs, the children...


To easily melt the Fels-Naptha in the hot water you can shred it and divide it into 3 zippy bags when you purchase it.


Let the soap/water mixture warm as you stir.  This is not a quick process.  You don't have to stir constantly, just make sure the mixture does not boil.  When it is fully melted you should not see any little pieces floating around as you stir it.


Once fully melted, add the 1/2 cup washing soda (I use Arm & Hammer because that is the only brand I have found) and the 1/2 cup Borax powder.

Again, do not let boil.  Cook and stir until well melded together and it has the consistency of vanilla pudding that hasn't quite set (this is just 1-2 minutes).

Fill your large bucket with very hot tap water, about 1/3 full.  Pour in the hot soap mixture.  Stir to combine.  Fill the bucket with more hot tap water just to the 2 gallon line.

Stir stir stir.

Let this set for 24 hours.  You will need to stir this before transferring into a smaller container for easier use.

We use an old large liquid laundry soap container and made a home-made funnel out of a clean milk jug that had the bottom cut off.


This makes 2 gallons of good quality laundry soap for less than a dollar.  The same amount of commercial soap would be close to $20 with tax.

Butternut Squash Chowder

Dinner tonight will be from one of my favorite crock-pot cookbooks "Slow Cooker Revolution" (publisher-The Editors at America's Test Kitchen).
http://www.barnesandnoble.com/w/slow-cooker-revolution-americas-test-kitchen-editors/1030632312?ean=9781933615691&itm=1&usri=slow+cooker+revolution

The further I cook into this cookbook the more I am convinced this could possibly be the BEST slow cooker cookbook out there.

On medium high heat crisp up 4 oz. of bacon (that you have sliced teeny tiny) in your favorite 12-inch (or so) deep skillet.

MMmmmm...bacon.

Now you will stir in 1 onion finely chopped, minced garlic (the recipe called for 3 garlic cloves), 1 1/2 tsp. fresh thyme (1/2 tsp. dried if you must...I always use fresh if at all possible) and nutmeg.

Here comes the cooking lesson:

To mince garlic perfectly there is nothing easier than using the food pro.

     1.  Break apart your head of garlic


     2.  Using a mallet whack each garlic clove


Unpeel all your cloves (if your fingers become sticky just rinse them under water briefly and go back to peeling).  They should just fall out of their skins.


But Kristi, this is a lot more than just 3 cloves of garlic!!
Ah....here is where I stray just a bit from most of the recipes I follow.  I am very heavy handed with garlic when I cook.  Garlic is wonderful for your health and I say the more, the better (in most cases).

     3.  Drop the cloves, one at a time, into your food pro while it is running (most food processors have a detachable piece in the top to allow you to do this).


You will hear when all the cloves stop dancing around the sharp blades and are reduced to little bits of garlic magic.


Now, since in this recipe the onion and garlic will be added to the skillet together, the easiest way to mince the onion is in the same food pro.

I always use sweet onions in my recipes.  These onions are much more mild than their yellow onion cousins and you will shed far fewer tears when preparing them.


Cut the top and bottom from your onion and peel off the tough outer layer.


Cut the onion in half, then into uniform pieces (about an inch or so squared).


Toss all this onion-y goodness into the food pro


Pulse pulse pulse pulse pulse pulse pulse pulse pulse pulse pulse...


For the thyme, the easiest way to get all those itty bitty leaves off the stems (no one wants to pull stems from their teeth) is to hold each stem at the top while pinching the stem with the other hand, then just zip the little leaves off.


For the nutmeg, always ALWAYS use fresh grated nutmeg.  Always.


Cook all this together for about 8 to 10 minutes, until the onions are nice and browned.


Now you are going to make a quick roux that will help thicken the chowder and give it the "oh yeah" factor.  To do this add about 1/3 cup flour (I use unbleached) to the pan and cook while stirring constantly for about 1 minute.  You are cooking the raw taste out of the flour.


Slowly whisk in about 2 cups of chicken stock, scraping all that goodness from the bottom of the pan.


Transfer this wonderful goopiness to your slow cooker.  I prefer to use slow cooker liners, but I didn't have any on hand and I really wanted to make this pot-o-goodness today.


Now add 2 more cups of chicken broth, 3 cups of veggie broth, about 1 1/2 lbs. of butternut squash cut into 1 inch cubes (thank you, Costco), and 2 bay leaves.


Now the cool part.  You are going to make a little "butternut squash present" to lay on top of the slow cooker:
  • Pile 1 1/2 more pounds of cut up squash on one side of a large piece of heavy duty aluminum foil.

  • Drizzle the squash with about 1 Tbs. veg. oil (I used canola oil), sprinkle with salt (to taste--don't be afraid to season!!) and pepper to taste.
  • Fold foil over and create an envelope by sealing the sides well (I fold up mine like I would a present).


Cook in the crock pot on low for 4-6 hours (I did the whole 6 hours).

Prepare 8 oz. kale to be added at the end of the cooking time above.  The kale I used came from my garden this morning.  It's hard to believe that same kale was under 12" of snow 3 days ago!


HEALTH ALERT:  Always wash fresh produce well prior to consuming.  I don't know what little Winter creatures have been partying in my garden lately, and I don't care to share any microbe friends with them.  Even store bought produce should be thoroughly washed.

I have a quart size spray bottle (filled with 1 tsp. bleach to the quart of water) that I keep under my kitchen sink.  Just lightly spray the produce and rinse thoroughly.  This will ensure that the produce you are feeding your family will not accidentally make them ill.


The kale needs to be cut into 1/4" strips.  The way to accomplish this is:
  • De-stem each kale leaf

  • Bunch together 4-5 leaf's worth and "roll" them into a cigar shape.  While holding the "cigar" cut into 1/4" slices


(After the 4-6 hours in the crock pot), remove the foil packet and set aside.  The cookbook suggested putting the foil packet on a plate...learn from my mistake and place in a metal bowl so the juicies don't run off your counter.  Careful, HOT!


Put the kale into the crock pot and cook on high for 20-30 more minutes.  I opted for 20 minutes because my family was hungry and I actually like my kale a little firmer.

Once the kale is cooked CAREFULLY open the foil packet (being careful not to burn your digits on the steam).  Add the cooked squash and any juicy goodness leftover back into the crock pot.

Stir in:
  • 1/2 cup heavy cream WHAT?  HEAVY CREAM?  I thought this was a health-nut-weight-watcher-never-have-any-fun site.  Ah, no.  We have lots of fun here.
  • 1 Tbs. fresh minced sage (this sage is from my back deck.  I highly recommend you grow an herb garden wherever you can.  Sage seems to love the colder weather).  To mince the sage follow the same concept as the kale
Pile the sage leaves on top of each other and cut into thin slices.

Now "rock" the knife over them in all different directions until you have the consistency you are looking for.


  • 1 tsp. brown sugar
Stir and let it heat through for about 5 minutes.

Ladle into bowls and top each bowl with Parmesan and a little extra grated nutmeg.

Note:  Always always always always ALWAYS use fresh grated Parmesan.  The green canned stuff should be used only as a door stop.


This was wonderful.  The taste was savory and rich with a wonderful texture from the firm almost chewy kale against the soft yummy squares of warm butternut squash.

Two thumbs up from my husband, R.J.
My 14 year old daughter, Jennie, thanked me twice.

Yeah.  This is a keeper.

WW Stats:

This made 10 servings (in our house a serving is two 1/2 cup ladles full).

4 slices bacon: 15
1/3 cup flour: 4
1 Tbs. canola oil: 4
1/2 cup heavy cream: 12
1 tsp. brown sugar: 0

35 pts/10 servings = 3.5 points per serving.  If you served it with the grated parm, count it as 4 pts. per bowl.